- 窗口层级树的构建
窗口层级树的构建
SystemServer.startOtherServices()
开始WMS的创建流程。
t.traceBegin("StartWindowManagerService");
// WMS needs sensor service ready
mSystemServiceManager.startBootPhase(t, SystemService.PHASE_WAIT_FOR_SENSOR_SERVICE);
wm = WindowManagerService.main(context, inputManager, !mFirstBoot, mOnlyCore,
        new PhoneWindowManager(), mActivityManagerService.mActivityTaskManager);
ServiceManager.addService(Context.WINDOW_SERVICE, wm, /* allowIsolated= */ false,
        DUMP_FLAG_PRIORITY_CRITICAL | DUMP_FLAG_PROTO);
ServiceManager.addService(Context.INPUT_SERVICE, inputManager,
        /* allowIsolated= */ false, DUMP_FLAG_PRIORITY_CRITICAL);
t.traceEnd();

t.traceBegin("SetWindowManagerService");
mActivityManagerService.setWindowManager(wm);
t.traceEnd();
setWindowManager()
调用AMS等服务的setWindowManager(),将WMS相关属性赋予内部成员(初始化)。
ActivityManagerService.java
public void setWindowManager(WindowManagerService wm) {
    synchronized (this) {
        mWindowManager = wm;
        mWmInternal = LocalServices.getService(WindowManagerInternal.class);
        mActivityTaskManager.setWindowManager(wm);
    }
}

ActivityTaskManagerService.java
public void setWindowManager(WindowManagerService wm) {
    synchronized (mGlobalLock) {
        mWindowManager = wm;
        mRootWindowContainer = wm.mRoot;
        mWindowOrganizerController.setWindowManager(wm);
        mTempConfig.setToDefaults();
        mTempConfig.setLocales(LocaleList.getDefault());
        mConfigurationSeq = mTempConfig.seq = 1;
        mRootWindowContainer.onConfigurationChanged(mTempConfig);
        mLockTaskController.setWindowManager(wm);
        mTaskSupervisor.setWindowManager(wm);
        mRootWindowContainer.setWindowManager(wm);
        if (mBackNavigationController != null) {
            mBackNavigationController.setWindowManager(wm);
        }
    }
}
RootWindowContainer.java
说明:获取全部可用的物理屏幕mDisplayManager.getDisplays(),并为每个物理屏幕构造窗口层级树new DisplayContent()。
void setWindowManager(WindowManagerService wm) {
    mWindowManager = wm;
    mDisplayManager = mService.mContext.getSystemService(DisplayManager.class);
    mDisplayManager.registerDisplayListener(this, mService.mUiHandler);
    mDisplayManagerInternal = LocalServices.getService(DisplayManagerInternal.class);

    final Display[] displays = mDisplayManager.getDisplays();
    for (int displayNdx = 0; displayNdx < displays.length; ++displayNdx) {
        final Display display = displays[displayNdx];
        final DisplayContent displayContent = new DisplayContent(display, this);
        addChild(displayContent, POSITION_BOTTOM);
        if (displayContent.mDisplayId == DEFAULT_DISPLAY) {
            mDefaultDisplay = displayContent;
        }
    }

    final TaskDisplayArea defaultTaskDisplayArea = getDefaultTaskDisplayArea();
    defaultTaskDisplayArea.getOrCreateRootHomeTask(ON_TOP);
    positionChildAt(POSITION_TOP, defaultTaskDisplayArea.mDisplayContent,
            false /* includingParents */);
}
以上调用详细情况暂时略过,在RootWindowContainer.setWindowManager()创建DisplayContent对象,便真正进入到了Android窗口层级树的创建过程。
new DisplayContent()
// 需要用Surfaceflinger绘制,所以需要进行surface相关配置
final Transaction pendingTransaction = getPendingTransaction();
configureSurfaces(pendingTransaction);
pendingTransaction.apply();
DisplayContent.configureSurfaces()
/**
 * Configures the surfaces hierarchy for DisplayContent
 * This method always recreates the main surface control but reparents the children
 * if they are already created.
 * @param transaction as part of which to perform the configuration
 */
private void configureSurfaces(Transaction transaction) {...}
说明:为DisplayContent(表示物理屏对象)构建surfaces层级。
// 首先构建DisplayAreaPolicy
// 这里的mDisplayAreaPolicy实际上是一个DisplayAreaPolicyBuilder.Result对象,static class Result extends DisplayAreaPolicy {...}
if (mDisplayAreaPolicy == null) {
    // Setup the policy and build the display area hierarchy.
    // Build the hierarchy only after creating the surface so it is reparented correctly
    mDisplayAreaPolicy = mWmService.getDisplayAreaPolicyProvider().instantiate(
            mWmService, this /* content */, this /* root */,
            mImeWindowsContainer);
}
mWmService.getDisplayAreaPolicyProvider()实际调用到了DisplayAreaPolicy.DefaultProvider类中。
DAP.DefaultProvider.instantiate()
DAP=DisplayAreaPolicy
DefaultProvider是DisplayAreaPolicy的静态内部类。
在DefaultProvider.instantiate()中主要执行以下操作:
- 准备TaskDisplayArea,这里是名为DefaultTaskDisplayArea的TaskDisplayArea容器,也就是用来放Activity的;
- 初始化HierarchyBuilder rootHierarchy对象;
- 设置ImeContainer和TaskDisplayArea;
- 执行configureTrustedHierarchyBuilder(),设置rootHierarchy相关数据(即窗口层级树);
- 配置完成执行DisplayAreaPolicyBuilder.build(),通过rootHierarchy构造窗口层级树。
/** Provider for platform-default display area policy. */
static final class DefaultProvider implements DisplayAreaPolicy.Provider {
    @Override
    public DisplayAreaPolicy instantiate(WindowManagerService wmService,
            DisplayContent content, RootDisplayArea root,
            DisplayArea.Tokens imeContainer) {
        final TaskDisplayArea defaultTaskDisplayArea = new TaskDisplayArea(content, wmService,
                "DefaultTaskDisplayArea", FEATURE_DEFAULT_TASK_CONTAINER);
        final List<TaskDisplayArea> tdaList = new ArrayList<>();
        tdaList.add(defaultTaskDisplayArea);

        // Define the features that will be supported under the root of the whole logical
        // display. The policy will build the DisplayArea hierarchy based on this.
        final HierarchyBuilder rootHierarchy = new HierarchyBuilder(root);
        // Set the essential containers (even if the display doesn't support IME).
        rootHierarchy.setImeContainer(imeContainer).setTaskDisplayAreas(tdaList);
        if (content.isTrusted()) {
            // Only trusted display can have system decorations.
            configureTrustedHierarchyBuilder(rootHierarchy, wmService, content);
        }

        // Instantiate the policy with the hierarchy defined above. This will create and attach
        // all the necessary DisplayAreas to the root.
        return new DisplayAreaPolicyBuilder().setRootHierarchy(rootHierarchy).build(wmService);
    }
    // …
}
DefaultProvider.configureTrustedHierarchyBuilder()
构造各个窗口层级的Feature,然后将构造好的Feature添加到HierarchyBuilder.mFeatures成员中。
private void configureTrustedHierarchyBuilder(HierarchyBuilder rootHierarchy,
        WindowManagerService wmService, DisplayContent content) {
    // WindowedMagnification should be on the top so that there is only one surface
    // to be magnified.
    rootHierarchy.addFeature(new Feature.Builder(wmService.mPolicy, "WindowedMagnification",
            FEATURE_WINDOWED_MAGNIFICATION)
            .upTo(TYPE_ACCESSIBILITY_MAGNIFICATION_OVERLAY)
            .except(TYPE_ACCESSIBILITY_MAGNIFICATION_OVERLAY)
            // Make the DA dimmable so that the magnify window also mirrors the dim layer.
            .setNewDisplayAreaSupplier(DisplayArea.Dimmable::new)
            .build());
    if (content.isDefaultDisplay) {
        // Only default display can have cutout.
        // See LocalDisplayAdapter.LocalDisplayDevice#getDisplayDeviceInfoLocked.
        rootHierarchy.addFeature(new Feature.Builder(wmService.mPolicy, "HideDisplayCutout",
                FEATURE_HIDE_DISPLAY_CUTOUT)
                .all()
                .except(TYPE_NAVIGATION_BAR, TYPE_NAVIGATION_BAR_PANEL, TYPE_STATUS_BAR,
                        TYPE_NOTIFICATION_SHADE)
                .build())
                .addFeature(new Feature.Builder(wmService.mPolicy, "OneHanded",
                        FEATURE_ONE_HANDED)
                        .all()
                        .except(TYPE_NAVIGATION_BAR, TYPE_NAVIGATION_BAR_PANEL,
                                TYPE_SECURE_SYSTEM_OVERLAY)
                        .build());
    }
    rootHierarchy
            .addFeature(new Feature.Builder(wmService.mPolicy, "FullscreenMagnification",
                    FEATURE_FULLSCREEN_MAGNIFICATION)
                    .all()
                    .except(TYPE_ACCESSIBILITY_MAGNIFICATION_OVERLAY, TYPE_INPUT_METHOD,
                            TYPE_INPUT_METHOD_DIALOG, TYPE_MAGNIFICATION_OVERLAY,
                            TYPE_NAVIGATION_BAR, TYPE_NAVIGATION_BAR_PANEL)
                    .build())
            .addFeature(new Feature.Builder(wmService.mPolicy, "ImePlaceholder",
                    FEATURE_IME_PLACEHOLDER)
                    .and(TYPE_INPUT_METHOD, TYPE_INPUT_METHOD_DIALOG)
                    .build());
}
以”WindowedMagnification”这个Feature为例:
rootHierarchy.addFeature(new Feature.Builder(wmService.mPolicy, "WindowedMagnification",
        FEATURE_WINDOWED_MAGNIFICATION)
        .upTo(TYPE_ACCESSIBILITY_MAGNIFICATION_OVERLAY)
        .except(TYPE_ACCESSIBILITY_MAGNIFICATION_OVERLAY)
        // Make the DA dimmable so that the magnify window also mirrors the dim layer.
        .setNewDisplayAreaSupplier(DisplayArea.Dimmable::new)
        .build());
Builder.upTo()
作用:添加WindowLayer到当前Feature。
根据传入的WindowType,调用getWindowLayerFromTypeLw()获取到对应的窗口层级。
/**
 * Set that the feature applies window types that are layerd at or below the layer of
 * the given window type.
 */
Builder upTo(int typeInclusive) {
    final int max = layerFromType(typeInclusive, false);
    for (int i = 0; i < max; i++) {
        mLayers[i] = true;
    }
    set(typeInclusive, true);
    return this;
}

private int layerFromType(int type, boolean internalWindows) {
    return mPolicy.getWindowLayerFromTypeLw(type, internalWindows);
}
将值保存在数值mLayers中,mLayers定义如下:
mLayers = new boolean[mPolicy.getMaxWindowLayer() + 1];
default int getMaxWindowLayer() {
    return 36;
}
mLayers是一个大小为37的boolean类型数组,对当前Feature对象,传入Type为TYPE_ACCESSIBILITY_MAGNIFICATION_OVERLAY,则返回Layer为32,则mLayers[0~31]=true,表示该Feature支持max=32以下的Layer。之后通过set(typeInclusive, true)设置mLayers[32]=true。
所以这一步Feature对象WindowedMagnification:0:32
Builder.except()
作用:排除WindowLayer到当前Feature。
/**
 * Set that the feature does not apply to the given window types.
 */
Builder except(int... types) {
    for (int i = 0; i < types.length; i++) {
        int type = types[i];
        set(type, false);
    }
    return this;
}
对WindowedMagnification,这里又排除了TYPE_ACCESSIBILITY_MAGNIFICATION_OVERLAY,所以这一步Feature对象WindowedMagnification:0:31。
Builder.setNewDisplayAreaSupplier()
/**
 * Sets the function to create new {@link DisplayArea} for this feature. By default, it
 * uses {@link DisplayArea}'s constructor.
 */
Builder setNewDisplayAreaSupplier(NewDisplayAreaSupplier newDisplayAreaSupplier) {
    mNewDisplayAreaSupplier = newDisplayAreaSupplier;
    return this;
}
所有Feature
// Only default display can have cutout.
// See LocalDisplayAdapter.LocalDisplayDevice#getDisplayDeviceInfoLocked.
rootHierarchy.addFeature(new Feature.Builder(wmService.mPolicy, "HideDisplayCutout",
        FEATURE_HIDE_DISPLAY_CUTOUT)
        .all()  // 添加[0,36]
        .except(TYPE_NAVIGATION_BAR, TYPE_NAVIGATION_BAR_PANEL, TYPE_STATUS_BAR,
                TYPE_NOTIFICATION_SHADE)  // 排除24,25,15,17
        .build())  // 排除36
        .addFeature(new Feature.Builder(wmService.mPolicy, "OneHanded",
                FEATURE_ONE_HANDED)
                .all()  // 添加[0,36]
                .except(TYPE_NAVIGATION_BAR, TYPE_NAVIGATION_BAR_PANEL,
                        TYPE_SECURE_SYSTEM_OVERLAY)  // 排除24,25,33
                .build());  // 排除36


rootHierarchy
        .addFeature(new Feature.Builder(wmService.mPolicy, "FullscreenMagnification",
                FEATURE_FULLSCREEN_MAGNIFICATION)
                .all()  // 添加[0,36]
                .except(TYPE_ACCESSIBILITY_MAGNIFICATION_OVERLAY, TYPE_INPUT_METHOD,
                        TYPE_INPUT_METHOD_DIALOG, TYPE_MAGNIFICATION_OVERLAY,
                        TYPE_NAVIGATION_BAR, TYPE_NAVIGATION_BAR_PANEL)
                .build())  // 排除32,13,14,28,24,25,36
        .addFeature(new Feature.Builder(wmService.mPolicy, "ImePlaceholder",
                FEATURE_IME_PLACEHOLDER)
                .and(TYPE_INPUT_METHOD, TYPE_INPUT_METHOD_DIALOG)  // 添加13,14
                .build());
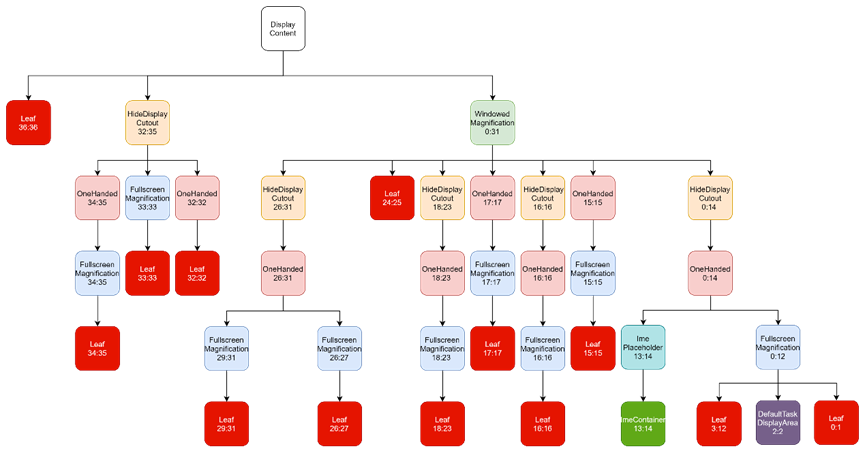
最后所有的窗口层级如下:
WindowedMagnification 0-31
HideDisplayCutout 0-14 16 18-23 26-35
OneHanded 0-23 26-32 34-35
FullscreenMagnification 0-12 15-23 26-27 29-31 33-35
ImePlaceholder 13-14
可以发现这些层级与dumpsys activity containers中是可以对应上的,接下来看一下怎么通过以上数据构建出dumpsys activity containers中的窗口层级树。
DisplayAreaPolicyBuilder.build()
由DisplayAreaPolicy.DefaultProvider.instantiate()调用而来。
说明:返回DisplayAreaPolicyBuilder.Result对象。Result是DisplayAreaPolicy的子类。static class Result extends DisplayAreaPolicy {…},用于在DisplayContent.configureSurfaces()中构建surfaces层级。
Result build(WindowManagerService wmService) {
    validate();

    // Attach DA group roots to screen hierarchy before adding windows to group hierarchies.
    mRootHierarchyBuilder.build(mDisplayAreaGroupHierarchyBuilders);
    List<RootDisplayArea> displayAreaGroupRoots = new ArrayList<>(
            mDisplayAreaGroupHierarchyBuilders.size());
    for (int i = 0; i < mDisplayAreaGroupHierarchyBuilders.size(); i++) {
        HierarchyBuilder hierarchyBuilder = mDisplayAreaGroupHierarchyBuilders.get(i);
        hierarchyBuilder.build();
        displayAreaGroupRoots.add(hierarchyBuilder.mRoot);
    }
    // Use the default function if it is not specified otherwise.
    if (mSelectRootForWindowFunc == null) {
        mSelectRootForWindowFunc = new DefaultSelectRootForWindowFunction(
                mRootHierarchyBuilder.mRoot, displayAreaGroupRoots);
    }
    return new Result(wmService, mRootHierarchyBuilder.mRoot, displayAreaGroupRoots,
            mSelectRootForWindowFunc, mSelectTaskDisplayAreaFunc);
}
HierarchyBuilder.build()
说明:HierarchyBuilder是DisplayAreaPolicyBuilder的内部类,其作用就是构建一个以RootDisplayArea mRoot为根的树,build()则是在初始化之后开始进行构建。
HierarchyBuilder.build()关键步骤如下:
final WindowManagerPolicy policy = mRoot.mWmService.mPolicy;
final int maxWindowLayerCount = policy.getMaxWindowLayer() + 1;
final DisplayArea.Tokens[] displayAreaForLayer =
        new DisplayArea.Tokens[maxWindowLayerCount];
final Map<Feature, List<DisplayArea<WindowContainer>>> featureAreas =
        new ArrayMap<>(mFeatures.size());
for (int i = 0; i < mFeatures.size(); i++) {
    featureAreas.put(mFeatures.get(i), new ArrayList<>());
}

// PendingArea是构造DisplayArea的暂时状态,这里37个
PendingArea[] areaForLayer = new PendingArea[maxWindowLayerCount];
// 设置root
final PendingArea root = new PendingArea(null, 0, null);
// areaForLayer全部用PendingArea root填充
Arrays.fill(areaForLayer, root);

// 这里的size就是configureTrustedHierarchyBuilder()中的5个
final int size = mFeatures.size();
for (int i = 0; i < size; i++) {
    // Traverse the features with the order they are defined, so that the early defined
    // feature will be on the top in the hierarchy.
    final Feature feature = mFeatures.get(i);  // 取出一个Feature
    PendingArea featureArea = null;  // 即将要设置的节点
    for (int layer = 0; layer < maxWindowLayerCount; layer++) {  // 按顺序依次设置
        if (feature.mWindowLayers[layer]) {  // 如果该feature包含第layer层
            // This feature will be applied to this window layer.
            //
            // We need to find a DisplayArea for it:
            // We can reuse the existing one if it was created for this feature for the
            // previous layer AND the last feature that applied to the previous layer is
            // the same as the feature that applied to the current layer (so they are ok
            // to share the same parent DisplayArea).
            // 如果当前节点为null,第1次设置时才为null
            // 如果当前节点不为null,
            if (featureArea == null || featureArea.mParent != areaForLayer[layer]) {
                // No suitable DisplayArea:
                // Create a new one under the previous area (as parent) for this layer.
                // 给当前节点设置父节点
                featureArea = new PendingArea(feature, layer, areaForLayer[layer]);
                // 将当前节点设置为子节点
                areaForLayer[layer].mChildren.add(featureArea);
            }
            // 更新
            areaForLayer[layer] = featureArea;
        } else {
            // This feature won't be applied to this window layer. If it needs to be
            // applied to the next layer, we will need to create a new DisplayArea for
            // that.
            featureArea = null;
        }
    }
}
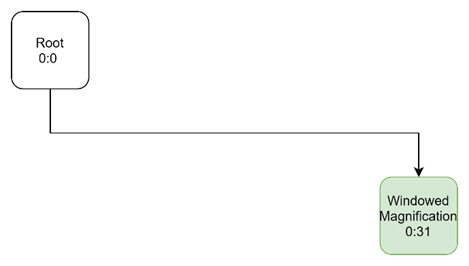
Feature: WindowedMagnification
注:PendingArea构造时只有minLayer。
以第1个Feature为例,其名为WindowedMagnification,层级为0~31,所以其feature.mWindowLayers[0~31]=true,feature[0]=WindowedMagnification:0:31。

layer=0时, areaForLayer[0]=root,featureArea=WindowedMagnification:0,如下:
    root:0(areaForLayer[0])
      \
       \
WindowedMagnification:0(featureArea)

然后areaForLayer[0]=WindowedMagnification:0,如下:
    root:0
      \
       \
WindowedMagnification:0(areaForLayer[0])

layer=1时,areaForLayer[0]=WindowedMagnification:0,areaForLayer[1]=root,featureArea=WindowedMagnification:1,featureArea的父节点root= areaForLayer[1],然后areaForLayer[1]=WindowedMagnification:1
    root:0
      \
       \
WindowedMagnification:1(areaForLayer[0])

于是WindowedMagnification:0和WindowedMagnification:1的父节点都为areaForLayer[0],可以记为WindowedMagnification:0:1,areaForLayer[0]记为root:0:0

所以第1个feature从0~31层,都是共用一个父节点,第1个feature执行完,最后为:
    root:0:0
      \
       \
WindowedMagnification:0:31
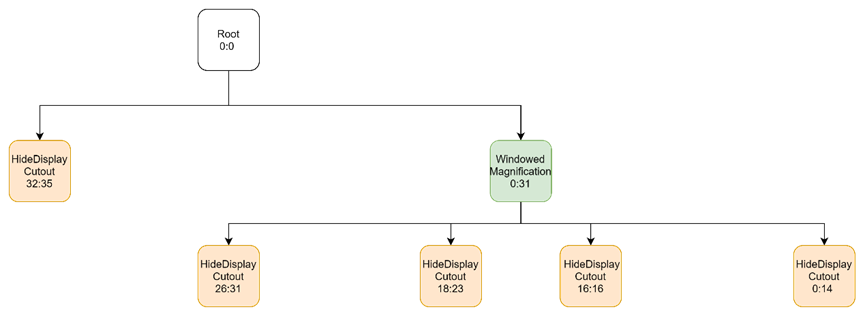
Feature: HideDisplayCutout
第2个feature为HideDisplayCutout:0-14 16 18-23 26-35
对HideDisplayCutout:0:14,其父节点为WindowedMagnification:0:14
对HideDisplayCutout:16:16,其父节点为WindowedMagnification:16:16
对HideDisplayCutout:18:23,其父节点为WindowedMagnification:18:23
对HideDisplayCutout:26:35,其父节点为WindowedMagnification:26:31和HideDisplayCutout:32:35(因为WindowedMagnification最大Layer为31)
表示为树如下:
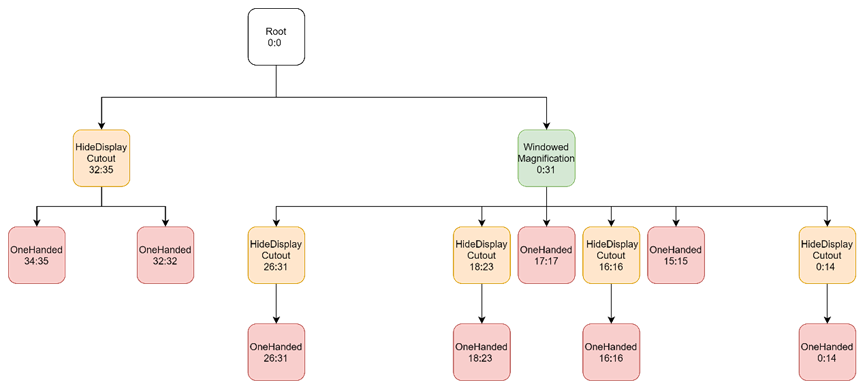
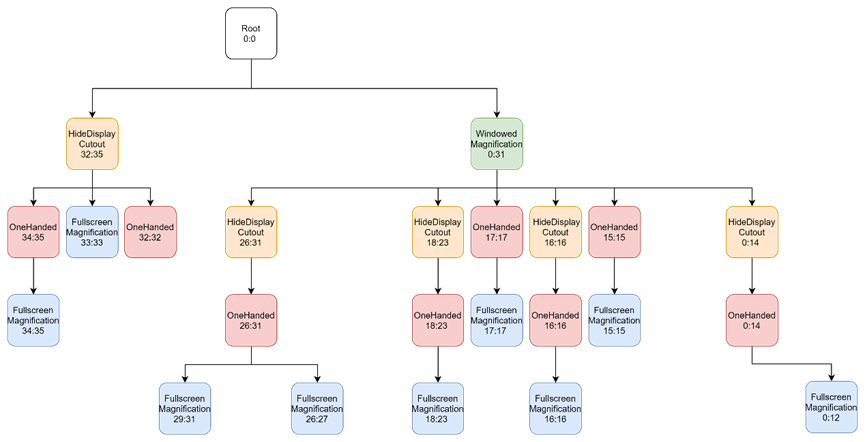
Feature: OneHanded
第3个feature为OneHanded 0-23 26-32 34-35
按照以上方法挂载后,树形如下:
Feature: FullscreenMagnification
第4个feature为FullscreenMagnification:0-12 15-23 26-27 29-31 33-35
按照以上方法挂载后,树形如下:
Feature: ImePlaceholder
第5个feature为ImePlaceholder 13-14

这就是5个feature加载完成之后,初步形成的窗口层级树,另外还要包含一些未赋值的null节点,如下:
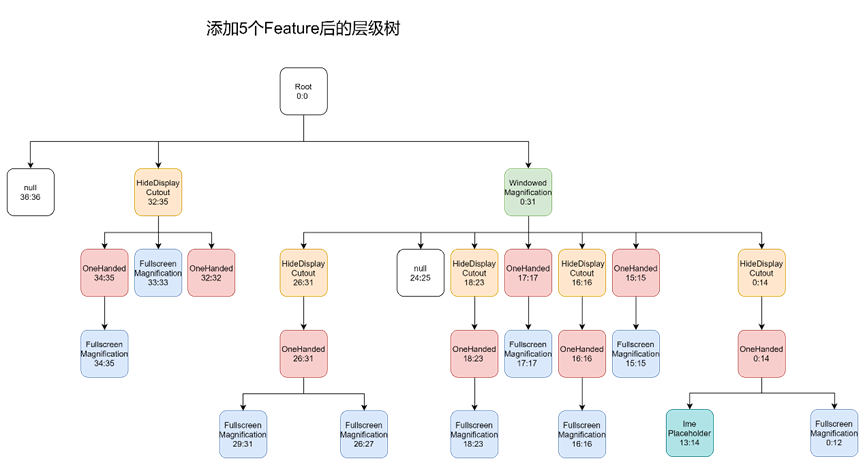
接下来还要对这棵树作进一步的配置。
配置子节点
接下来执行以下步骤:
- 为每个叶子节点后面都新增一个子节点,子节点的Feature name为空,记为Leaf:min:max;
- 对TaskDisplayArea(即Layer 2)和ImeContainer(即Layer 13:14)作特殊处理。
注:为什么是Layer 2和Layer 13:14,是在typeOfLayer()中确定的。
// Create Tokens as leaf for every layer.
PendingArea leafArea = null;
int leafType = LEAF_TYPE_TOKENS;
for (int layer = 0; layer < maxWindowLayerCount; layer++) {  // 遍历每个节点
    // 获取每个节点的类型,除了TaskDisplayArea和ImeContainer外,其它的type都为LEAF_TYPE_TOKENS,详见typeOfLayer()函数
    int type = typeOfLayer(policy, layer);
    // Check whether we can reuse the same Tokens with the previous layer. This happens
    // if the previous layer is the same type as the current layer AND there is no
    // feature that applies to only one of them.
    if (leafArea == null || leafArea.mParent != areaForLayer[layer]
            || type != leafType) {
        // Create a new Tokens for this layer.
        // 创建子节点,设置父节点
        // 给每一个叶子节点都挂载一个PendingArea
        leafArea = new PendingArea(null /* feature */, layer, areaForLayer[layer]);
        areaForLayer[layer].mChildren.add(leafArea);
        leafType = type;
        // 针对TYPE_TASK_CONTAINERS作特殊处理,即Layer 2
        if (leafType == LEAF_TYPE_TASK_CONTAINERS) {
            // We use the passed in TaskDisplayAreas for task container type of layer.
            // Skip creating Tokens even if there is no TDA.
            // 设置叶子节点Layer 2设置为一个APPLICATION_LAYER类型的节点
            addTaskDisplayAreasToApplicationLayer(areaForLayer[layer]);
            addDisplayAreaGroupsToApplicationLayer(areaForLayer[layer],
                    displayAreaGroupHierarchyBuilders);
            leafArea.mSkipTokens = true;  // 跳过,不添加Tokens
        // 针对TYPE_IME_CONTAINERS作特殊处理,即Layer 13:14
        } else if (leafType == LEAF_TYPE_IME_CONTAINERS) {
            // We use the passed in ImeContainer for ime container type of layer.
            // Skip creating Tokens even if there is no ime container.
            // 将叶子节点Layer13:14设置为ImeContainer类型
            leafArea.mExisting = mImeContainer;
            leafArea.mSkipTokens = true;
        }
    }
    leafArea.mMaxLayer = layer;
}

// 返回类型
private static int typeOfLayer(WindowManagerPolicy policy, int layer) {
    // 设置areaForLayer[2]为TYPE_TASK_CONTAINERS,作为Activity的容器
    if (layer == APPLICATION_LAYER) {
        return LEAF_TYPE_TASK_CONTAINERS;
    } else if (layer == policy.getWindowLayerFromTypeLw(TYPE_INPUT_METHOD)
            || layer == policy.getWindowLayerFromTypeLw(TYPE_INPUT_METHOD_DIALOG)) {
        // 设置areaForLayer[13]和设置areaForLayer[14]为TYPE_IME_CONTAINERS,作为输入法的容器
        return LEAF_TYPE_IME_CONTAINERS;
    } else {
        // 其它都标记为TYPE_TOKENS,之后会添加一个Tokens子节点
        return LEAF_TYPE_TOKENS;
    }
}
注:APPLICATION_LAYER定义于WindowManagerPolicyConstants.APPLICATION_LAYER,表示层级树中显示APP的Activity的层级。
经过这一次配置之后的层级树如下:
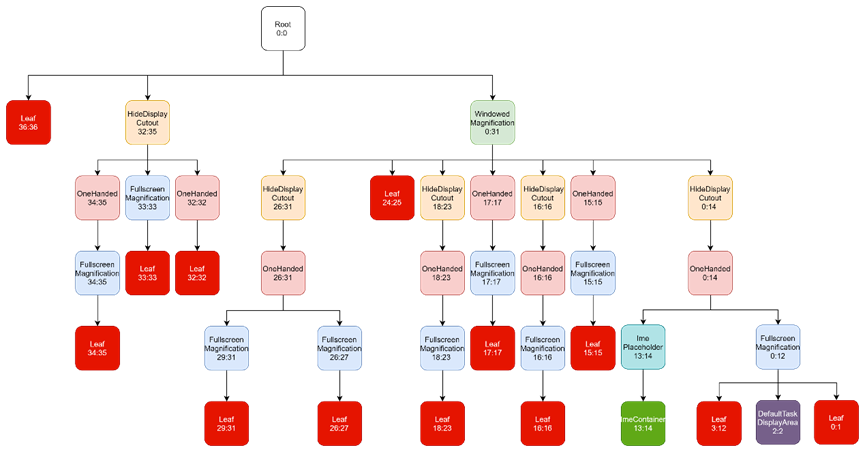
上述执行完成后,PendingArea[] areaForLayer = new PendingArea[37]这颗树基本配置完了,但它只是个PendingArea[],并不是DisplayArea,并且根节点Root:0:0也不是DisplayContent(表示一个显示屏)。
Attach to DisplayAreas
说明:开始实例化上面构建的areaForLayer[37]这颗树,该树根节点为root。
// 以根节点root开始,递归计算每个节点的最大Layer
root.computeMaxLayer();

// 根据areaForLayer[37]建立DisplayArea
// mRoot作为窗口树的根节点,实际上是一个DisplayContent
// displayAreaForLayer[37]只是在上面构造了,接下来才会赋值
// We built a tree of PendingAreas above with all the necessary info to represent the
// hierarchy, now create and attach real DisplayAreas to the root.
root.instantiateChildren(mRoot, displayAreaForLayer, 0, featureAreas);

// Notify the root that we have finished attaching all the DisplayAreas. Cache all the
// feature related collections there for fast access.
mRoot.onHierarchyBuilt(mFeatures, displayAreaForLayer, featureAreas);
PendingArea.instantiateChildren()
注:PendingArea是DisplayAreaPolicyBuilder的静态内部类。
说明:在这一步主要将之前构建的areaForLayer[37]实例化,将其中的PendingArea转换为DisplayArea。并逐个添加到以mRoot(DisplayContent对象)为根节点的树中。
void instantiateChildren(DisplayArea<DisplayArea> parent, DisplayArea.Tokens[] areaForLayer,
        int level, Map<Feature, List<DisplayArea<WindowContainer>>> areas) {
    mChildren.sort(Comparator.comparingInt(pendingArea -> pendingArea.mMinLayer));
    for (int i = 0; i < mChildren.size(); i++) {
        // 将PendingArea转换为DisplayArea
        final PendingArea child = mChildren.get(i);
        final DisplayArea area = child.createArea(parent, areaForLayer);
        if (area == null) {  // TaskDisplayArea and ImeContainer为null
            // TaskDisplayArea and ImeContainer can be set at different hierarchy, so it can
            // be null.
            continue;
        }
        // 以mRoot开始,逐个添加子节点
        parent.addChild(area, WindowContainer.POSITION_TOP);
        if (child.mFeature != null) {
            areas.get(child.mFeature).add(area);
        }
        // 子节点继续递归,直到构建整个树
        child.instantiateChildren(area, areaForLayer, level + 1, areas);
    }
}